Friday, May 6, 2011

Part 3 of 3 Part Project


Part 3
of 3 Part Project:)
Finishing up:)

Well, here we are at Part 3 of my 3 Part Project:)
Part 1 was the ATC Holder from
Retro Cafe Art
Part 2 was the 7gypsies 'Mini Library Drawer'
To finish up my project, I had purchased

7gypsies Index Cards to embellish for the 
file drawer, but decided to do something a
little more creative.

I made my own file cards....
A very easy, although a bit time consuming,
but it was a great way to use up all of the
bits and pieces of paper that I end up
collecting from other projects..
I used, stamps, and coloured with chalks,
(one of my favourite ways of colouring),
and used rub-ons, embellishments, buttons,
and particularly enjoyed making the file
cards themselves.
I used punches, that are for decorative labels
and punched out chipboard templates.
Then when drawing out the file cards, I placed
the label template at the top of the cards outline
to incorporate the top half of the labels shape
at the top of the file card. A bit fussy to hand cut
afterwards, but I think you'll agree that the cards shape turned out pretty good:)
And here's the finished 'secret':)
I found out at the beginning of this project,
that the ATC Holder from Retro Cafe Art
fits in the slots of the 7gypsies 'Mini Library Drawer'!
The trick, (as I said in Part 1 of the embellishing of the
ATC Holder), is not to embellish below the sides of
the ATC Holder so that they don't interfere with
it's sitting in the slot:)
Now I have this on my desk, ready with blank ATC Cards and Playing Cards prepped already with backgrounds done, for
ATC making when ever I wish at a moments notice.
(Another great way to use up small bits and pieces from
other projects while still in a art mood:)
7gypsies also makes a Large 'Library Drawer' 
With this one, I only went as far as glueing on 
billiard balls to make feet, as I had spent so much
time making the index cards that I just wanted
to start using it!
(I'll post another time the index cards as they're a 'Circus Theme'
and quite fun:)
All three of these items, the ATC Holder, and both the 7gypsies Library Drawers are great ways to keep clutter on your art desk's 
organized and I think they're even motivating.
Hope you've enjoyed the 3 Part Series, as it's been 
my first attempt at a sort of 'tutorial', (grin).
I just like to share:)
I'll be posting more projects and art pieces over the weekend so do check back!
Enjoy!


Monday, May 2, 2011

While waiting for Part 3 of my ATC Project:)

Here's another one of my 
Framed Collage Mixed Media Pieces
in my 'Oh Deer' Series
I call 'Oh Deer Dilemma'
(Please excuse the poor quality photo, still trying
to learn how to take photos with reflecting glass)
Here it is out of the frame so you can
see the details.
As you can read, you can see 
what the dilemma was:) :) :)
Enjoy!
(quick note:)
Bubbie my favourite deer that I refer to on my blog isn't my only 'tame' friend:)
here's just some of Bubbie's family of deer that 
come to our home and neighbour's each day:)
The one in the middle with the antlers is
'Big Boy' the 'father' of the herd.
(Bubbie on the right hand side, had to
wash my lens after this photo session:)
At certain times, we have as many as 22
come for treats, and at this Springs count,
5 generations:)
And yes, I've been tracking all of them for
nearly 24 years!
A great hobby:)
Cheers!


3 Part Project - ATC Holder -Part 2:)


3 Part Project continued...

Part 2
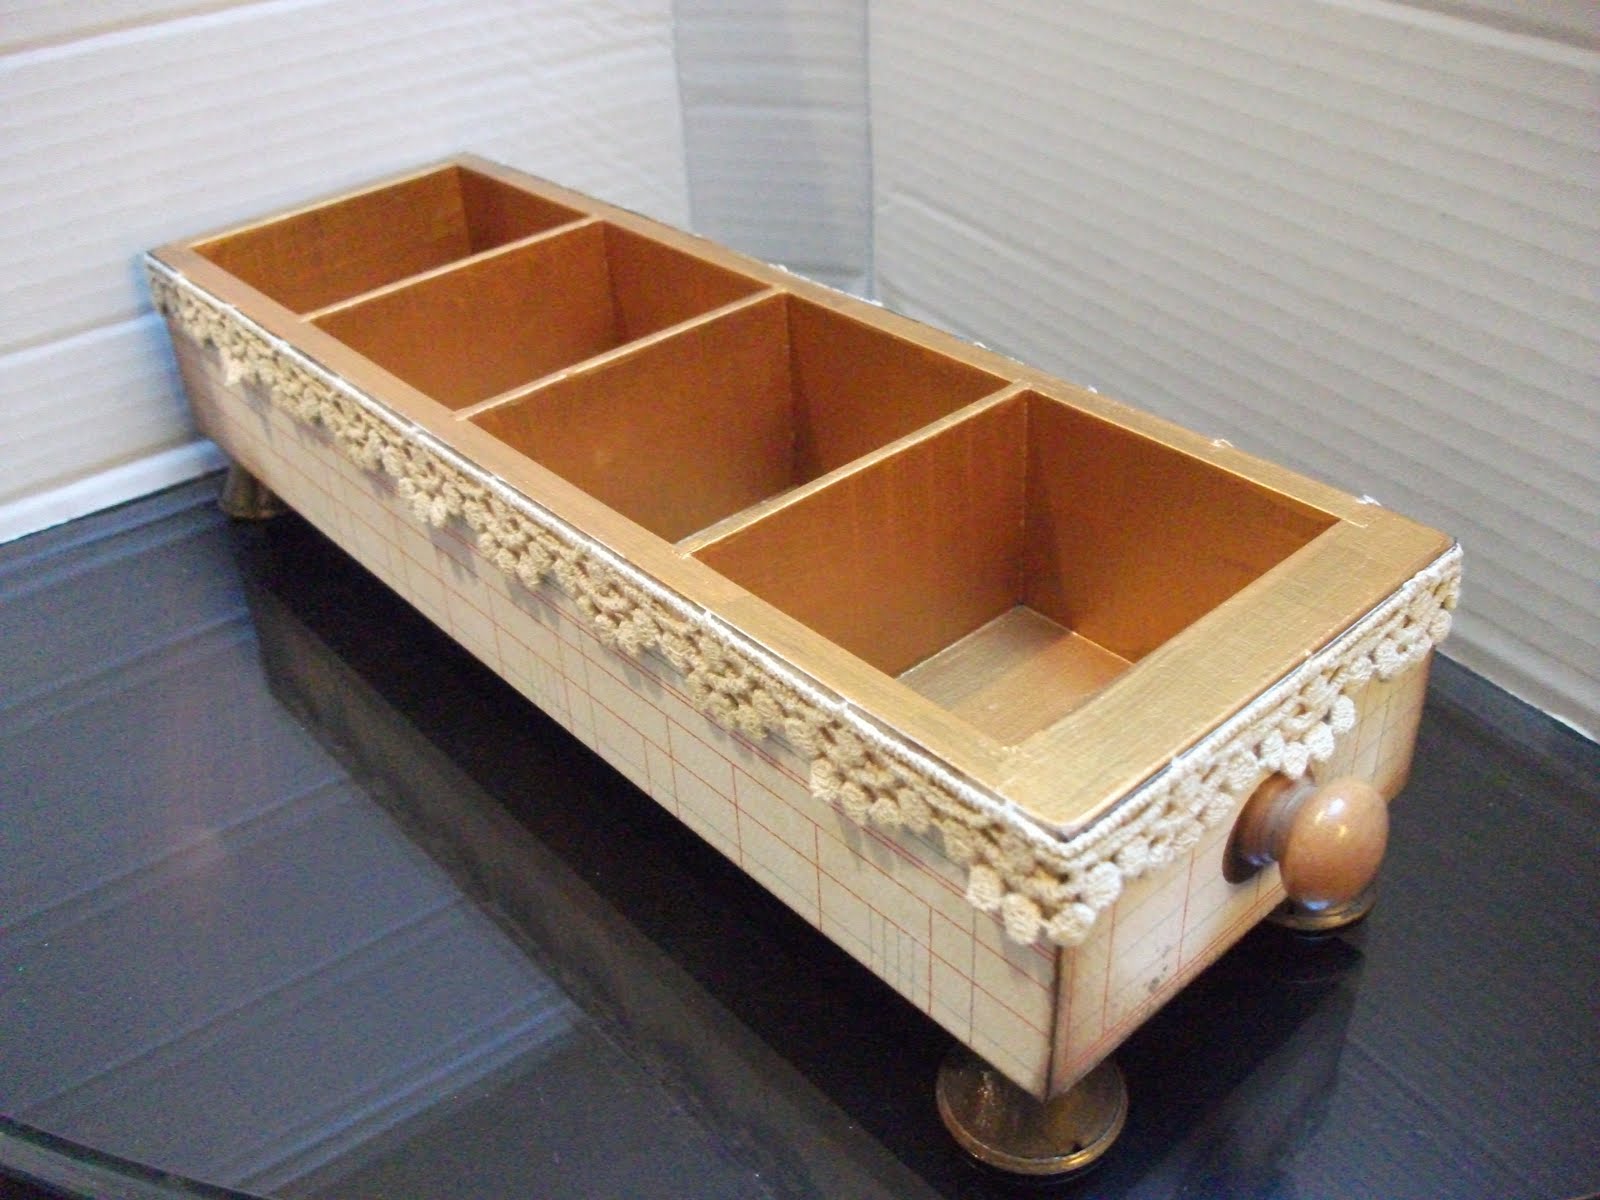
7gypsies 'Mini ATC Library Drawer'


Hello again:)
So, in Part 1 of my project, 
I used the ATC Holder that I purchased
from Retro Cafe Art
http://www.retrocafeart.com/
(And again, thanks Kristin:)

In Part 2, I'll be using the
7gypsies 'Mini ATC Library Drawer'
that I purchased from
Blue Moon Scrapbooking
http://www.bluemoonscrapbooking.com
(Thanks to Scott and Family!)


I started out with the blank 7gypsies
'Mini ATC Library Drawer'
I gave it a quick light sanding to give it some 'tooth'.
Then I took heavy weight scrap book paper and 
using Matte Gel Medium, glued paper to cover the
outside of the Library Drawer.
(In this example, I used 'My Mind's Eye' Paper
'Stella and Rose' a new line of papers by 'My Mind's Eye' 
that I'm currently enjoying using, also purchased 
from Blue Moon Scrapbooking:)


After it was all covered on the 'outside' of the
Library Drawer, I then used
Tim Holtz Distress Ink, 'Walnut Stain'
to ink all of the corners and edges to 
give it a 'used grungy look'.

As you know from Part 1, 
I enjoyed adding feet to the ATC Holder, 
well, in Part 2, I really enjoyed this part:) :) :)


One of my favourite things to do is go 'digging' 
at local Salvage Shops with my Pal-in-Art Leslie:)

(I'll be showcasing some of Leslie's great
Art Pieces periodically in my blog, as I am
'gobsmacked' by her talents!)

In one of our 'digs', 
I found these great solid brass nobs from an old dresser. 
Well! 
They make great feet for my project as they
are decorative yet, 
 have a flat surface so the
Library Drawer will be stable.

My 'trick' for applying them is a wonderful product
that Leslie showed me to use for many such ways
of applying metal to surfaces to get them to stick.
Clear Bathroom and Kitchen Caulking!
( I buy this stuff practically by the case!)
Just make sure you use it in a well ventilated room!
(I learned the hard way, cough, cough:)
Once the caulking had dried....

I embellished the top edge of the 
Mini ATC Library Drawer
with this beautiful cotton vintage inspired lace
that I purchased from Melissa Samuels at
http://www.melissasamuels.net/store
(Thank you Melissa:)

(Locally, here in Victoria, B.C. you can
also find this wonderful lace and great
scrapbooking papers and supplies at
Scrapbook Parade!
Link in my favourites list, Thanks Carol:)

I used Matte Accents, by Inkssentials to attach,
and used clothes pins to hold in place until it dried.


On the inside of the Library Drawer, I used a
new product, that I'm really enjoying thinking
up other uses for, as it's very cool how it dries.
Again from Retro Cafe Art:)
I purchased 
'No-Prep' Metal Paint from DecoArt
This paint is so cool, as it dries, there are
no brush strokes or blemishes!
I chose the gold colour to highlight the grungy parts 
on the outside of the piece.
Again, use this in a well ventilated area!
But it dries fast, and really is a forgiving paint
to use!

The finished piece of Part 2 
of my 3 Part Project.
I decided not to embellish it further, and 
in Part 3 of my project you'll see why:)
Please check back to see the rest of 
the Project, and do try this at home:) :)

Enjoy!


Saturday, April 30, 2011

3 Part Project.....ATC Holder


Post Part 1
ATC Holder

Hello Everyone:)
I took a day off from Blog Land, as you have to from time to time to get some Art Time in:)
I've been playing with some Commercial Products, and have put together something, I think is a little different.
I'll be posting this project in 3 parts, as it is completed, so if you wish to follow along to make these yourself, jump right in and enjoy:)

I'm thrilled that this part of the project, 
 last month, was chosen to be  posted on 
Retro Cafe Art's Gallery Blog Page, 
featuring this, 
( Thanks so much Kristin!), 
as I purchased the blank ATC Holder from Retro's Online Shop.
(You'll find the link to the Shop in my Favourites List:)

The ATC Holder comes flat, and is easy to put together, (I used Inkssentials, Glossy Accents to glue together, but standard glues will work fine too). Then, I chose my paper and covered the entire outside of the box, (to glue the  paper, I used Gel Medium).
Then I used Tim Holtz, Distress Ink, Walnut Stain, to grunge up all the corners and edges...then came the fun part, embellishments:)
The first picture was of the front of the ATC Holder, using some of Tim Holtz Embellishments, this picture is the back of the Holder. I also put embellishments on the sides, but you'll notice they aren't as detailed as the front and back....there's a reason  that will reveal itself in my Part 2 and Part 3 Posts still to come:)


You'll also notice, the feet:)
I found that the material that the ATC Holder is made of worked great for a 'mini foot' idea that I came up with. 
The Tim Holtz 'Hitches' that are used in two parts to put things together, I used just the 'nob' end. I used a craft pic to make a small hole and filled the hole with Glossy Accents, and put the post of the hitch in the hole.
Hence the feet!!! ( I think they are cute)


Then I used a new paint that I haven't tried before also purchased from Retro Cafe Art, called No-Prep Metal Paint, by DecoArt, that painted on like a dream! I love this new paint, as it dries, all blemishes and brush strokes disappear! I also used it on the 
Number 2, (also a Tim Holtz Product), and again, as it dried, no brush strokes!

So this is Part 1, hope you'll think about giving this a try:)
I'll be posting Part 2, of this project either later today or tomorrow so please check back. I think when you see the complete project, you'll be tempted to make this yourselves!
Enjoy!


Tuesday, April 26, 2011

Love Shopping!

So for those of you who know me personally, just about anyone who has met me, knows that one of my favourite things is to shop. (GRIN)
I'm always looking for something unique and special to add to my art room, or home, that stands out....
I am also a great fan of the Etsy Community of Shops, and have been a buyer for the past couple of years of many different vintage and handmade collectables.
But my most recent purchase I think has taken the 'cake' so to say:)


I have found an Etsy.com shop in Paris, France, (Yippie!!!)
Called LaPomme
(I have Lapol's link listed in my favourites list)
This is a vintage piece that was from a turn of the century sewing store in Paris! You may be saying to yourselves, 'what would she want that for?'
Well!
All of my ink pads, with which I have a huge collection of will now be housed in my new vintage shelves:) 
I thought this was clever! Although the cost of shipping isn't so great, but if you go to Lapol's shop, you'll see her prices are more than reasonable!
(It'll be our secret between us)
Wink:)
I'll post a picture when it arrives and is full of my inks:)
Cheers


Eat Cake:)

Ok, so it was late night, nothing sweet to eat...
so I decided to try my hand at making a 
paper cake....I think I got a little
carried away:)
Enjoy!

Canvas Book

This is one of my largest, and most complex assemblage pieces to date. (With full intentions to do more:)
It's an 8" x 8" Canvas Book. I started off with 2 - blank 8x8" canvases, and covered them with handmade paper, (sorry to say I didn't make the paper, but plan on learning how to this year:)
Then I hinged them together on the wood 'spine', and off I went!
Two pieces that really motivated me to make this were the wonderful 'Tim Holtz' feet, that can be inked and altered, but I chose to leave them blank, as I thought the details were interesting enough. And the other piece that gave me this idea, were the salvaged door knobs and plates. I love digging through salvage stores, and looking for interesting unusual items that can be incorporated as elements in my projects.

The front cover is papered chipboard with metal embellishments, all inked and glued. I loved how the handmade paper has large flecks of gold paper and threads in it's layers, helped add to the piece.


The back cover, I again played with an embellishment from the 'Tim Holtz' alterations product line, and as I usually do, incorporated an element of something from nature.

I used a cut piece of packaging plastic to make a dust cover for the feather in the embellishment frame, and was pleased that it makes the beauty of the feather pop. (The picture doesn't do it justice:).


But it was the inside that was the most fun to create:) When you free form pile 'like' objects, it is so much fun and relaxing! It took days of 'try this here' and 'see what this looks like' to come up with the finished piece. I found it hard to stop, as I kept finding more items to glue in, stamp, and layer.


This project also helped 'justify' my hoarding of all bits and pieces, with the intention of their possible 'use' in the future:)


I had a great deal of fun with this piece. And after stopping, and proclaiming it finished, all extras, new ideas, and things I learned while making it from my mistakes, will be the motivation to start another one:) :) :)
Hope this motivates you to give it a try too!
Enjoy!