Friday, August 19, 2011

Melissa Samuels Gift Certificate Giveaway!


Hello Everyone!
(Can you tell I'm excited!)

As I've been telling you in previous posts,
something Special was coming up on my blog,
and today is the day!

I'm so thrilled and pleased to be
co-hosting my very first

Gift Certificate Giveaway!
This has been in the works for the past
few weeks, and I don't know how I've
managed to keep it a secret, (grin)!

I'd like to present, (drumroll please),
(ok, so Oliver Howard isn't very good on the drum,
much better at barking:)

As one of my favourite things to do here on my blog
I'd like to give a 'Shout Out' to 
Melissa Samuels
'The Art of Scrapbooking'
Shop and Blog
who is now a 
Proud Distributor 
of one of my
Favourite Stamp Product Lines

'La Blanche' Stamps
(This is a picture of some of the 
La BlancheStamps 
I have in my personal collection:)

On Melissa's Shop Page
www.melissasamuels.net
(Link in my Favourite's Listing)

Melissa has this wonderful 
La Blanche Demo from
CHA Summer 2011
That absolutely grabbed my attention!
At CHA Melissa became a New Distributor
for the Entire La Blanche Stamp Product Line
in the U.S. and has brought in for her new
product line in her shop, 
so many of this years new stamps
from La Blanche!


So here's the 
Gift Certificate Giveaway
requirements:)

First: To enter into the Giveaway please
sign on as a 'Google Follower'
here on my blog at
then leave a 
'Comment' here on this Blog Post
telling me you've entered the
Giveaway 


then
Please go to 
Melissa Samuels Blog 
(Link in Favourite's Listing)
And sign on Melissa's Blog as a
'Google' Follower and
leave a 'Comment' on her 
La Blanche Page Blog Post
for your chance to Win a Free 
La Blanche Stamp from Melissa, and
where Melissa can show you 
examples and give you information
about this wonderful Stamp Product Line!
 Then 
You have officially entered in the
Gift Certificate Giveaway
to win a $25 Gift Certificate to
Melissa Samuels Shop!

I will be running the Giveaway
until September 2, 2011
and will announce the 
'Winner'
of the $25 Gift Certificate to
Melissa's Shop on that Friday!
I will then post who the Winner is and
ask you to email me your email address
so I can send your $25 Gift Certificate to you:)

Based on the wonderful Video that
Melissa has on her Shop Page that
she made from the CHA Convention
Summer 2011
And, Melissa's wonderful Talent with
Cards, Scrapbooking, and Journal Making,
I decided to post an example of one
of my projects, using the techniques
I learned from Melissa's Video that
would be a little different from the
normal use of the stamps.

In a previous blog post I showed you 
some wonderful wood cigar boxes that
had been gifted to me from dear friends:)
Well since that Blog post, I've looked at
this box, and came up with this.....
Now you're wondering...
what does this have to do with the 
La Blanche Stamps...well
The inside of the box is lined with
Stamped Images from my collection of the
La Blanche Stamps
and using the wonderful technique of using
UTEE to highlight the image with also
the use of Tim Holtz 'Distress Inks' by Ranger
This is what I came up with as an example:)
I love the texturing that using the UTEE
(Ultra Thick Embossing Enamel)
produces!
And the crisp colours that jump out at you with
these great detailed stamps!
The top of the box, using Tim Holtz 'Fragments'
I used many of my other collection of stamps
(also their Companies are listed in my Favourites Listing)
and hand inked and painted using 
Water-Soluble Crayons then pasted the images
to the bottom of the Fragments using 
Inkssentials 'Glossy Accents'.
I will say, the idea for the top of this box came
from Tim Holtz blog, where he created this
layered use of the Fragments:)
(Thanks Mr. Tim)
Using some of my other Favourite Embellishments
I inked, stamped, and used the tissue transfer
technique to create the 'labels'
And used the La Blanche Stamps again
using the UTEE to create a textured label 
for the sides of the cigar box.

So I hope you'll take the time to enter and
pass on the word to your friends,
into my First Giveaway!

And hope you'll take the time to go
to Melissa Samuels Blog and Shop
and watch her wonderful CHA Video!

Cheers!
(And have a great Weekend!)

Enjoy!


Monday, August 15, 2011

The 'Girls' just want to party! :)

BOO!


Hello Everyone!
First off, this is going to be a multipurpose 
blog post today, to make up for missing
a blog post last Friday:(
(So sorry, but 'real life' grabbed me and
I couldn't get back to 'blog land':)
Above is the one and only picture I've 
manipulated of my
dear 'Oliver Howard' with
a computer program to play around with
pictures......he's 'devil' dog in this for
Halloween:)
(grin)...

Now, down to business:)

I'd like to give a 'Shout Out' for
my dear friend Gail Schmidt, of
Shabby Cottage Studio
(link in my Favourites List)
at
www.shabbycottagestudio.com
who has been supplying me
with these wonderful 
body forms!
The 'girls' arrived today, and I'm 
thrilled to be thinking up more ideas
for creating further assemblages:)
(I'm sure Gail won't mind sharing this post)
as previously posted
Gail's wonderful body form from her shop at
Shabby Cottage Studios
was used in this previously blog posted piece
that is also highlighted at
Retro Cafe Art 
(also listed in my Favourite's Listing:)
www.RetroCafeArt.com
as the 'wings' are one
of Kristin's wonderful products, as previously 
mentioned, and she currently still has in 
stock, so....
Please go check out both of these wonderful 
Internet Shops 
Shabby Cottage Studios for these great body
forms and other wonderful treats, 
and Retro Cafe Art for the beautiful paper
wing selection (as they also come in
gold and silver!) and check out
Kristin's wonderful selection of 
Coffee Break Design 'goodies too!
for these supplies that you
will be able to create with!

Now all that being said:)
A couple of quick journal pages
I've been playing around with...
The stamps that I used were from
the wonderful shop Redlead, 
I love their stamp line:)
And a couple of extra mini projects
I put together to add to the journal I'm
currently working on. I find that
I ping pong between projects but when
the 'creative bug' hits, I run with it, 
even if it means for something I'm not
currently working on, it gets put to the
side until time later on to add to.
(Love the birdcage graphic from Graphic's Fairy)
Used the tissue transfer technique.

So my next blog post which will be this coming
Friday, August 19th is something really special!
I will be 'hosting' a Giveaway right 
here on my blog, in conjunction with someone
really special that most of you already 
know in the industry, who will be coordinating
a Giveaway along with me on her blog as well!
I'm keeping it secret until Friday:)
So you'll have to make sure by Friday Night
to check in as see what all the excitement is about:)


So until then.....
Hope to see you Friday Night!

Enjoy!!!!


Tuesday, August 9, 2011

Filler Post...but busy in the art room!!!

Hello Everyone:)

Just wanted to let you know, that I'm currently
working on two major pieces to be posted later
this week, but in the meantime, (as I've been a
bit late in my posts), was my last post, (my entry for
Retro Cafe Arts 'Shrine Contest' which is coming
up to the closing date of September 2nd, so there's still
time for you to enter! ), was such a major project,
that I thought I'd wear myself out, but the two pieces
I'm working on now, will be just as involved and intricate,
so I'm in hopes of them being interesting posts for you all.

So I'm referring to this post as a 'filler' post, in hopes
that you'll see a bit of eye candy, and to update you
on all that is going on 'behind the scenes' :)

So, no, it's not Christmas in July, as I've been seeing on other blogs and such lately....


It's Halloween in August :)
(This is Jake, our Animatronic Butler, 1 of many of
my husbands animatronic collection)

There are so many Holidays and events in peoples lives,
but my husband and I celebrate only a few days
a year. Always our birthdays, our Anniversary,
usually Christmas, and the occasional Valentine's Day,
as we've been married 24 years this September, and
do not have children, ( or much family anymore),
but Halloween is one Holiday we both relish 
with complete abandon, 
and enjoy like a couple of kids. 
Our home ends up being the 'dumping ground'
for all things 'tacky and wonderful'
in Halloween decorations, mostly inside,
but outside in our yard as well.
My husband's collections of Animatronic witches,
goblins, skeletons that overtake our home each year
(some are as tall as 6 feet!), is always backed up
with his incredible collection of 'Michaels Craft Stores'
'Halloween Lighted Village' pieces...
( that's a whole other post down the road!),
but my thing is my collection of Halloween Art Dolls
and Primitive Halloween Dolls, that end up all over
the place along with every other Halloween goodies
we spot each year to add to our collection.
(Not the greatest picture, sorry)
But this is to prove, that I do know how to sew:)
Each year it gets hung up, and I'm always 
motivated to drag the sewing machine out, but
the last couple of years that's usually forgotten
about by December, (grin).

Anyway here's a couple of Halloween projects that
I completed...
From my Vintage Photo Collection...
I find I don't collect very many photos of men,
but this one is one of my favourites...
Can you imagine kissing that fur under his nose!

Halloween 'Story Board'
It was a fun piece to make, using all the great
Halloween embellishments that the stores fill up
with, and no matter how many boxes I have
left over each year, I always end up seeing something
new, and getting more for the next round of crafting.


Another little 'goofy' piece that I enjoyed playing with:)

So, behind the scene's, I'm also working on a few
'Giveaway Contests'
that I'm currently working out the details for
to host on my blog in the coming weeks with
some of my Favourite Suppliers!
 With Prizes
of Gift Certificates, and Products 
for the winners!
I'm really stoked about this, as I am not a
business, or actively selling my art and crafts,
but want to help promote some of the
wonderful Internet Shops that have given me
such great service, and great support! 
(As well as promote my blog with 'followers' 
as down the road, I may be considering an 
Etsy Shop, or something along that line as
I am being encouraged to do).

So do check back often, as I can see a flurry
of posts in the near future!!
Cheers to you all!

Enjoy!


Sunday, July 31, 2011

Shrine Contest Entry:) for Retro Cafe Art:)


Hello Everyone:)
Well, in my last post just last Thursday,
I had stated that I was attempting to get
some quality art time in my art room this weekend.
I'm pleased to report, that here it is
Sunday morning, and I can honestly
say I've worked hard 
in the art room since Friday night:) 
Matter of fact....I haven't been to sleep
since Saturday morning!
Yes, I've pulled a 24 hour art
marathon!
(Husband and dogs quite happy watching any movies they want, eating tons of treats, and dozing whenever! What a great trade off for some quality art time!)
(I'm sick of coffee at the moment, grin).
But for all the effort, to finish up my
latest project, I'm quite pleased to show
you my entry for 
Retro Cafe Art's Shrine Contest that
Kristin Hubick is hosting!
Yes, the Contest Diva is having another
wonderful opportunity for all of us
to enter into another fun contest!
Go to Retro Cafe Art's Blog Gallery
(Link in my Favourites List:)
and there's still time for you to enter!!!
This is one of Kristin's big Shrine Kits
by Coffee Break Design
called 'La Guardarropa Shrine'
and you can purchase your own kit at
Retro Cafe Art:)
I painted the masonite kit, once I put it all together with 
Claudine Hellmuth's ,Studio Paint, Charcoal Black.
Then I took plain computer paper, used my favourite 
selection on script stamps, and used Distress Inks
 for the base paper covering the shrine. I again
used the same coloured Distress Inks, on computer
paper I had run through my Tim Holtz Vagabond, with
a 5 x 7 Cuttlebug Embossing folder, to create the paper
for the door panels.
The 'knobs' are Tim Holtz 'Hitches' that I like to
use as feet for these kits, but this time I also used
them for the door knobs. I used Glossy Accents
to set them into paper lined mini shrine pieces,
(also from Retro Cafe Art:).
Embellished the top of the shrine with 
a vintage watch face, and the word 'wish'
with Red Lead Alphabet beads:)

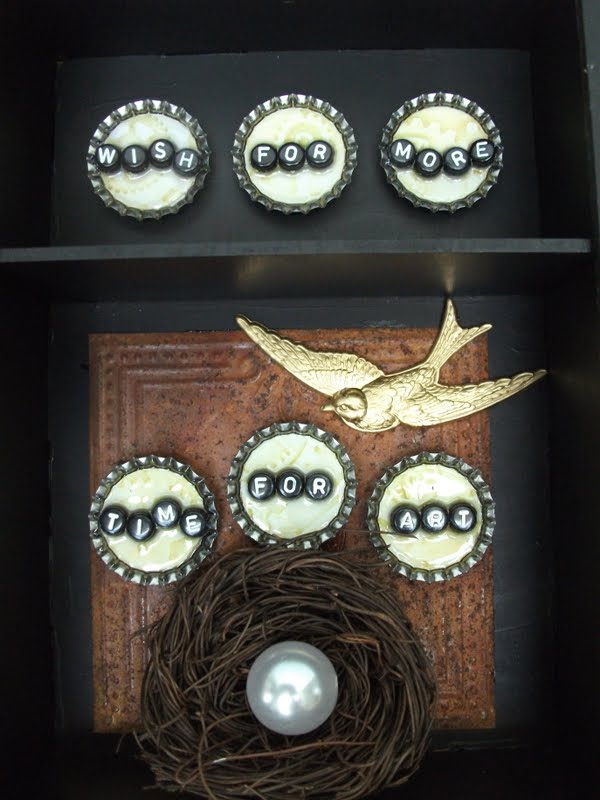
Then on the inside...
I took more of the embellished paper and made
bottle caps using the paper lining, to spell out
my 'wish':)
Further embellishment from Retro Cafe Art,
Masonite gears, (LOVE these!)
A small birds nest with a pearl, 
(suppose to be for wisdom, LOL),
and more of Kristin's new brass charms!
I love these charms, the great Brass Frame and Bee
from Kristin:)
(Vintage watch face with Tim Holtz 'Game Spinner'
and Red Lead's Beads:)

Also the cool Rusted Tile and the 
Brass Bird from Kristin:)

Then the back of the shrine...

I had so much fun making up these little
brass frames, that I decided I'd sign my
piece a bit differently this time:)

So now that I've finished my project and
posted it on my blog for all of you to see
something new....I'm off 
to enjoy some 'Husband and dog time'
for what is left of the weekend:)
Maybe even get a little nap in, and
watch some movies, and eat some treats:)
If 'they' left me any:)

Enjoy!


Thursday, July 28, 2011

Old and New:)


Hello Everyone:)
So this week I'm posting a little earlier than Friday as I have great hopes of being in my art room all weekend:)
In this household with all the pets, you never know if there will be time to grab for some art time, so I find if I announce that I'm scheduling time, usual the husband will take note and deal with the 'motley crew' and other creatures in our zoo:)

First off, it's become apparent to me, that all over
the Internet, Halloween projects are popping up.
I've even seen Christmas projects already being
posted, now usually I wouldn't get on the 'early train', 
but from an earlier post of mine, I've had this little
pile of goodies sitting on my art desk.
I tend to 'pile' things on my desk, in an effort
to get 'inspired' by usually a group of things
that don't quite make sense to me. It isn't until
I add something, or find something that triggers
an idea, that it begins to make sense. All I knew a few
weeks ago, is 'Halloween' when I saw this little group...
So, I purchased this little cardboard ornament from
Chris and Sharon at Red Lead a while back.
(Link to their wonderful shop in my Favourite's List).
I painted the ornament with Claudine Hellmuth's 
Studio Paint, Charcoal Black.
Using one of my favourite tools in my art room,
Glossy Accents by Inkssentials,
I glued the ribbon all around the outside edge of
the ornament.
I then took a plain mini paper doily, and used
Tim Holtz 'Distress Ink' Wild Honey and Walnut Stain
to cover the entire doily.
I used a paintbrush to cover a thin coat
of the Glossy Accents over the face of the
cardboard ornament, and placed the doily
on the painted ornament. Used a quick 
brush with my brayer to make sure that
it was sealed. After it was dry....
I chose one of my very favourite 
Vintage Photographs from my collection
You'll see these two girls from time to time,
as they're from my own collection, and they
print up on the printer really well:)
(A small project like this I wouldn't want to
use the original photograph. I'd only do that 
for a very special project piece).
I took a moon graphic and the 'girls' photograph
and printed them up, cut them out and placed them
on the doily along with picking out some head gear 
for them to wear:)
And of course, Fashion being what it is,
they also had to have other embellishments...
these are Kristin Hubick's new line of 
embellishment made by Coffee Break Design and
these were purchased from
Retro Cafe Art:)
(Kristin Hubick's Link in my Favourites List:)
(They're so fun to play with!)
I added a bit of Distress 'Stickles' to the glasses
'Picket Fence'
(Love the horn rim pair!)
And a couple of the pop out stars from the glasses.
(Even the salvage bits  can be used from these cut-outs!)
Next up...a greeting....
I LOVE THESE BEADS!!
Every time I place an order with Chris and Sharon
at Red Lead, I always try to remember to purchase
an extra couple of bags of these beads. If I could
afford it, I'd buy a case of them, as I love how
they make a statement in the black and white:)

So there you go, I'm officially taking the 
'Early Train'
on Halloween:)
I'll wait awhile before posting any more Halloween projects,
but then, Halloween is my absolute favourite of Holidays,
so don't hold me to that! :)

So that was the 'New' in this weeks blog post, and here's a bit of 
'Old' as I want to add more eye-candy for your enjoyment:)

It's been long enough now, that I feel I can post this past project that I did a few months ago.
We had a wonderful pet parrot named 'Connie' a few months
ago, pass away without warning. She's was a very special
pet of mine, as she was a gift to me soon after the loss of my mum.
We have had dozens of different species of parrots and other birds come through our home over the years. At one time we actually had 18 birds, 9 different species living with us.
Anyway Connie, was a Black-Capped Conure
And we referred to her as the 'Kitchen Conure'
as she was the only one that was allowed to live
in my kitchen, as she became a constant source 
of entertainment to me as she grew, and her vocabulary
was really out of this world!
(Most of our birds are rescue birds, and usually are difficult to be handled, but Connie was only 12 weeks old when she arrived, totally pliable and willing to learn).
I owed this little creature something really special
as she certainly was a main reason for dealing with
the grief of losing my mum.
So Connie the Kitchen Conure inspired this...
14x20 Mixed Media Canvas.
Caption says: 'Everyone who meets her,
marvels about her vocabulary.
What they don't hear or see,
is what she has taught me.'

I didn't know it at the time, that it would be just
a few months later that I would lose Connie as well.
Now, I'm so glad that she inspired me to give the canvas
a try, as it reminds me everyday of her, as I still
expect every morning when I go into my kitchen
to hear, 'wanna peanut!'
(Ok, so she was a little demanding once she figured
out the meaning of the words, but that's because she
was so brilliant!)
Anyway, now there's another parrot in the kitchen, our
dear old, (20+ year old), Chico who is a Maroon-bellied Conure,
and has her own vocabulary:) I figured it was time for
Chico to have a 'retirement' from the flock, and get real
one on one time. Now I hear, 'Kiss the beak' every morning, (grin).
And just so you know, the rest of the flock 
are actually in our living room:) 
We gave it over to the birds years ago, 
as we're suckers for a needy creature:)

So hope you've enjoyed the blog posting for this coming week.
It's a particularly long one, but hope you find it of interest:)
Have a great weekend!

Enjoy!


Saturday, July 23, 2011

Saturday Night Quickie:)

Hello Everyone:)
I hadn't expected to do a blog posting
this weekend, but I've had a great
Saturday afternoon in the art room
and decided to take a break and
show you the latest:)

It's another ATC Holder from
Retro Cafe Art
that I've put together since I still had
all the wonderful bits and pieces out
from the last one that I made.
And of course....bird related:)
As you remember the previous one that I made
that all the entries in Kristin's Contest won!
I've had a slew of wonderful comments
on these already, and even a offer of a
commissioned piece for holding business cards!
I'm really pleased, and have great fun making these:)

And a quick Shout Out for
 Kristin Hubick
at Retro Cafe Art Gallery as
she's gone 'Bonkers' with
I believe 3 Contests going all at once!
Please check out her Gallery Page
(Link is in my Favourites List:)
for all the information!
Also, while you're there,
please check out her 
New Design Team
Jennifer
Gerri  and Bianca's
Wonderful examples of their
Altered Art!
What Talent!

Enjoy!